Wednesday, October 24, 2012

How do you debug your stored procedures?

Well, perhaps 'Debugging' is not the best way to describe it. If you need to debug a procedure step-by-step, there are tools within SQL Server (or Visual Studio) that will, in most cases, allow you to do so.

But in real life (or let's just say - production), we often face a different situation where Stored-Procedures are being executed by the Application side (DAL's in most cases)
And sometimes, we don't just need to see which procedure was executed when (if we want to do this Profiler is there to help) - we need to track certain activities inside the stored procedures.

While application developers have a lot of logger libraries (such as Log4Net, for example), SQL Developers don't have an out-of-the-box solution.

So SQL Developers write their own solutions, and sometimes even use PRINT (god forbid!) within the procedures to track the output (yes, even today!)

This is why we've created Log Table Viewer.
The solution includes a simple table/procedure to write the log message (+severity and some other optional properties), and a client viewer to easily see and explore the written messages.

After deploying the solution (which is done automatically by the viewer app - by clicking this button):

you get a new procedure, which can be executed as simple as that:


EXEC usp_write_to_log @source='TestScript', @message='Hello World', @severity=1

What happens (by default) is this:
1:
You see an immediate output to the screen (if executed by SSMS) with the message
[Oct 24 2012  4:06:13:397AM] Hello World
The console does not use "PRINT" (which does not flush immediately into the screen), but rather a RAISERROR(@console_message,10,1) WITH NOWAIT statement, which is better in these cases

2:
A log message is written to our log table (tblLog)


There are many other option parameters when executing the procedures, here's the actually interface:
usp_write_to_log( 
 @source VARCHAR(255),
 @message VARCHAR(4192), -- 4k
 @severity INT = 1, /*0=Debug, 1=Informational, 2=Warning, 3=Critical*/
 @category INT = 1, /*1=Databases. For future use if more clients use this usp*/
 @write_to_console BIT = 1, /*New: Only write to console, not table*/
 @write_to_table BIT = 1, /*New: Only write to table not console */
 @write_to_sql_log BIT = 1, /*New: output to SQL errorlog as well (only for warning, error)*/
 @write_to_sql_log_minimum_severity INT = 3,
 @suppress BIT = 0 /*New emergency option; When compiled with (1) no actual writes to tblLog are made.*/
                           )


So now, you can easily use this procedure to write various messages inside your SQL Code.
Here's a screenshot for one of my servers, with some recent messages (just so you get the look & feel)
You can see the "Hello World" message we just wrote on the previous example:

Log Table Viewer - Real-time display


Tuesday, October 16, 2012

Triple release day!

3 Updates are being released today, for ClipTable, Database File-Explorer & Log-table Viewer

Here's the change-log:


ClipTable:
- BCP (insert) mode is now available! ClipTable can generate a BCP IN statement of any CSV file
- Added an option to turn any column into a string (after clipboard import is done)
- Data in grid can automatically extend on edit
- Better white-spaces handling on string analysis
- Improved XML detection
- SQL Text highlight feature implemented
- Multiple UI improvements
- v1.0.3.2 Released

Database File-Explorer:
- Log file is now being recycled when over a configured size (currently 10mb)
- Added ChangeLog (inside the About Window)
- Core classes updated
- SQL Text highlight feature implemented
- Shared Repository:
- Added SQL Profiler integration
- If multiple versions are installed, SSMS/Profiler will launch at the newest version
- Multiple UI improvements
v1.0.2.3 released


LogTableViewer:
- Main Engine updated
- SQL Text highlight feature implemented
- Multiple UI improvements
v2.0.1.6 Released


Shared Repository: (which means, all of the above)
   - Added SQL Profiler integration
   - If multiple versions are installed, SSMS/Profiler will launch at the newest version
   - Multiple UI improvements

Download all for free: 


Wednesday, October 3, 2012

(ClipTable) INSERT solutions

Hey ClipTable users!

As a user, you probably already know how ClipTable can quickly turn any data into a SQL Table.
The main-stream option would be:
- Copying a tabular data into your clipboard
- Pressing the magical "Import" button
- Defining a destination server
- Execute!

But there is more to it; Today I'm going to cover some other INSERT options ClipTable supports


For the demo I'm going to use a simple query against AdventureWorksLT2008:
select from AdventureWorksLT2008.SalesLT.CustomerAddress
I'm taking the result and saving it as a CSV file, and also copying the result into the clipboard.


The first one is the "Generate INSERT Statement" option; which, instead of pumping the data into the table, creates an insert script you can launch anywhere.
Here's how you use it:

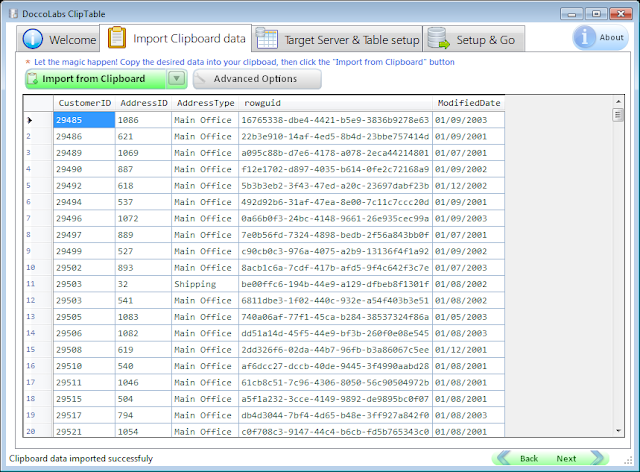
Copying the above query data into the clipboard, I click "Import from Clipboard", and the query data now appears in ClipTable (see screenshot):


Next, I'm going to jump right to the "Setup & Go" tab, but instead of clicking "Execute", I'm going to click the other part of the button, which contains additional insertion options (see screenshot):


Now, select the "Generate INSERT statements only", and the following window appears:

From this point, simply copy the data and execute anywhere you want.
Easy, isn't it?

Now let's move on to the other option: BULK INSERT.
On this option, you let ClipTable perform a field analysis on a CSV file, and then creating a complete BULK INSERT statement to load this file into a table, without having ClipTable to read the entire content into the memory first.
Needless to say, this feature is not 100% bullet-proof due to some known differences with BULK INSERT behavior  as well as the fact that the default option is to not analyzing to entire file (speed & memory considerations), so field types may need some additional tune-ups.

OK, Let's go back to the "Import Clipboard Data" tab, only this time, we'll select the "Import from File" option (see screenshot):


Now, let's choose the CSV we've prepared earlier.
Before doing so, as a preparation for the bulk insert, there are two options we're going to change:
1. Make sure "Treat NULL strings as DbNull" option is unchecked
2. Uncheck "Data contains Headers" (since the CSV file does not contain headers on the 1st line)
(see screenshot):

Now, let's jump to the "Setup & Go" tab again and choose the "Generate BULK INSERT" option.
The following window appears:

Again, you can now use this data from your Management Studio (or equivalent) in order to load the data into your table.


Ready to give it a shot?
Get the latest version (for free) here: http://www.doccolabs.com/products_cliptable.html

Cheers